This article shares an approach to the development workflow for frontend applications within Clean Architecture.
Repository with example:
https://github.com/harunou/frontend-clean-architecture-exercise
Nice to know as well: https://react.dev/learn/thinking-in-react
Table of Contents
- Step 1: Add User Interface, Controller, and Presenter Units
- Step 2: Add Entities Unit
- Step 3: Add Gateway Unit Factory
- Step 4: Connect the Presenter Unit to the Entities Unit
- Step 5: Connect the Controller Unit to the Entities Unit and the Gateway Unit
- Step 6: Add the In-Memory Gateway Unit
- Step 7: Implement the External Resource Unit
- Step 8: Add the Remote Gateway Unit
- Conclusion
Building a frontend application that follows Clean Architecture is simple and straightforward. The general approach is to build units according to the Clean Architecture UML implementation, connecting them step by step to get the application up and running.
Let's examine the development workflow of a counter application in detail.
Before starting the implementation process, a developer typically has:
-
The application requirements:
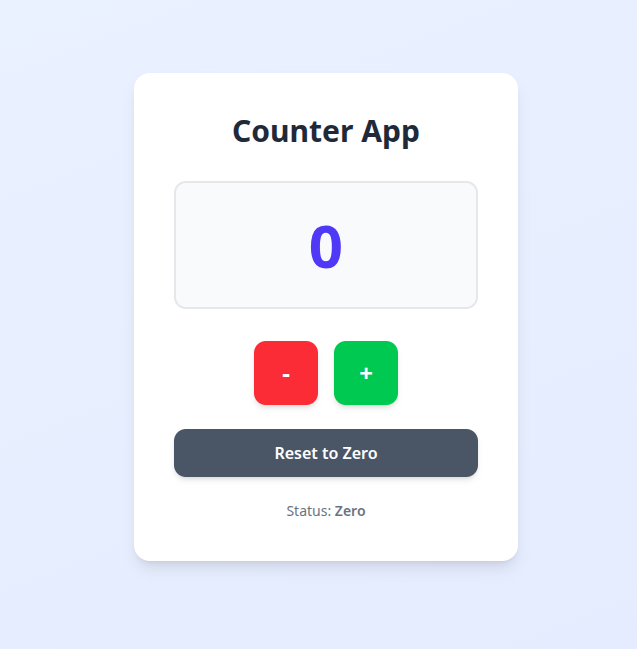
- The application should display a counter value.
- The application should display the counter status based on its value:
Positive,Negative, orZero. - The application should allow incrementing the counter value.
- The application should allow decrementing the counter value.
- The application should allow resetting the counter value to
0. - The counter logic is performed on the server side.
- The initial counter value is stored on the server side.
- The initial counter value before the first request is
0.
A basic sketch of the user interface:
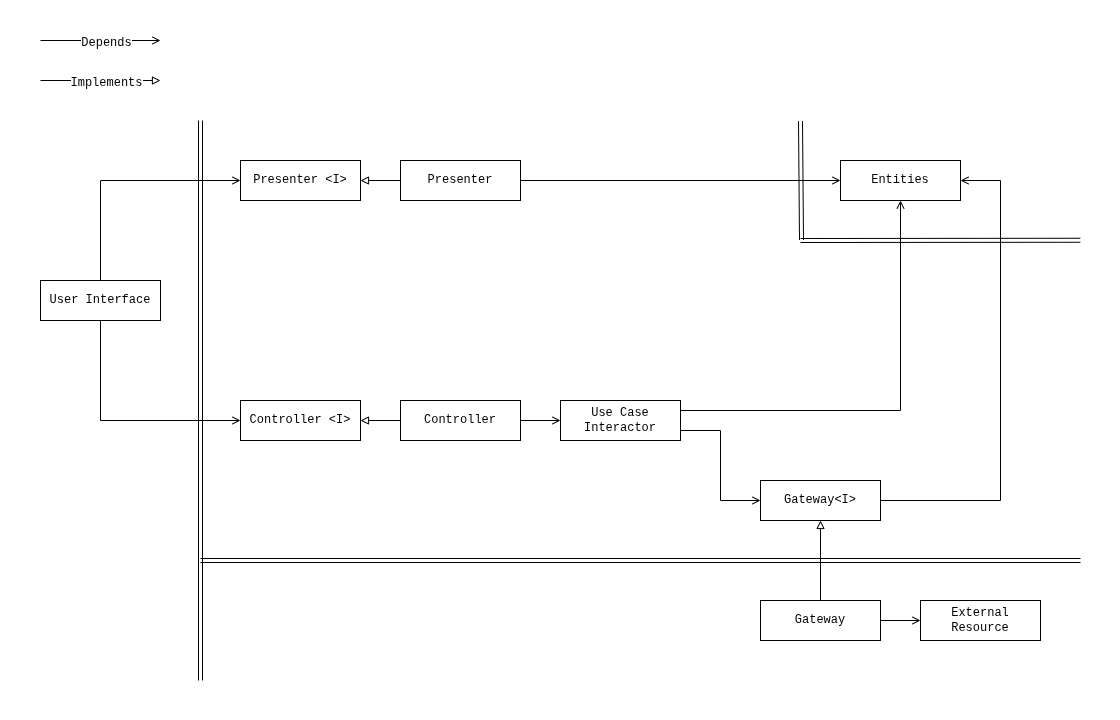
To build the application, we will use the Clean Architecture UML diagram for frontend applications.
Step 1: Add User Interface, Controller, and Presenter Units
The first step is to create the user interface unit, which is based on the user interface sketch. The user interface is the most straightforward unit to implement at this stage, as it focuses on presenting data and handling user interactions. If the backend is ready and API definitions are available, the external resource unit can be developed in parallel with the user interface. In this example, we assume the backend is not yet ready, so we start with the user interface.
Building the user interface unit helps to understand the application, while getting something (the user interface unit) done. For a simple counter application, we can use mocked presenter and controller units to provide test data and handlers, making it possible to test the user interface in the browser right away. These presenter and controller units can be easily extracted later as the application evolves.
function Counter() {
  // presenter unit implemented with constants (null presenter)
  // the presenter has assigned mocked data for testing in browser
  const countValue = 0;
  const countStatus = "Positive";
  // controller unit implemented with constants (null controller)
  // the controller has assigned mocked data for testing in browser
  const onIncrementButtonClick = () => {};
  const onDecrementButtonClick = () => {};
  const onResetButtonClick = () => {};
  // user interface unit
  return (
    <div className="min-h-screen bg-gradient-to-br from-blue-50 to-indigo-100 flex items-center justify-center p-4">
      <div className="bg-white rounded-2xl shadow-lg p-10 text-center max-w-sm w-full">
        {/* Header */}
        <h1 className="text-3xl font-bold text-gray-800 mb-8">Counter App</h1>
        {/* Counter Value Display */}
        <div className="bg-gray-50 rounded-xl py-8 mb-8 border-2 border-gray-200">
          <span className="text-6xl font-bold text-indigo-600">
            {countValue}
          </span>
        </div>
        {/* Control Buttons */}
        <div className="flex gap-4 justify-center mb-6">
          <button
            onClick={onDecrementButtonClick}
            className="w-16 h-16 bg-red-500 hover:bg-red-600 text-white text-2xl font-bold rounded-xl shadow-md hover:shadow-lg transform hover:-translate-y-0.5 transition-all duration-200"
          >
            -
          </button>
          <button
            onClick={onIncrementButtonClick}
            className="w-16 h-16 bg-green-500 hover:bg-green-600 text-white text-2xl font-bold rounded-xl shadow-md hover:shadow-lg transform hover:-translate-y-0.5 transition-all duration-200"
          >
            +
          </button>
        </div>
        {/* Reset Button */}
        <button
          onClick={onResetButtonClick}
          className="w-full py-3 px-6 bg-gray-600 hover:bg-gray-700 text-white font-semibold rounded-xl shadow-md hover:shadow-lg transform hover:-translate-y-0.5 transition-all duration-200"
        >
          Reset to Zero
        </button>
        {/* Count Status Display */}
        <p className="text-gray-500 text-sm mt-6">
          Status: <span className={`font-semibold`}>{countStatus}</span>
        </p>
      </div>
    </div>
  );
}
At this stage, the user interface unit is considered closed.
Step 2: Add Entities Unit
Once the user interface unit is ready, we can analyze the controller and presenter interfaces and design the entities unit. The entities unit is an aggregate that maintains a collection of enterprise and/or application business entities and their states. In our case, the entities unit holds a single enterprise business entity: the counter, represented by a count value. useState is the store utility that manages its state.
const INITIAL_COUNT = 0;

function Counter() {
  // entities unit: enterprise business entity (counter)
  // useState is the store utility managing its state
  const [count, setCount] = useState(INITIAL_COUNT);

  // presenter unit implemented with constants (null presenter)
  // the presenter has assigned mocked data for testing in browser
  const countValue = 0;
  const countStatus = "Positive";
  // controller unit implemented with constants (null controller)
  // the controller has assigned mocked data for testing in browser
  const onIncrementButtonClick = () => {};
  const onDecrementButtonClick = () => {};
  const onResetButtonClick = () => {};
  // user interface unit
  return (
    ...
  );
}
At this stage, the entities unit is considered closed.
Step 3: Add Gateway Unit Factory
Since the application connects to a backend service, the next step is to introduce the gateway unit factory. The gateway unit serves as an abstraction layer between the application and external resources.
In our counter application, the factory will provide a gateway unit with methods to access server-side logic. A simple gateway unit factory might look like this:
// gateway unit interface (yet empty)
interface CounterGateway {}

// gateway unit factory
const useCounterGateway = (): CounterGateway => {
  return {} as CounterGateway;
};

const INITIAL_COUNT = 0;

function Counter() {
  // entities unit: enterprise business entity (counter)
  // useState is the store utility managing its state
  const [count, setCount] = useState(INITIAL_COUNT);

  // gateway unit
  const gateway = useCounterGateway();

  // presenter unit implemented with constants (null presenter)
  // the presenter has assigned mocked data for testing in browser
  const countValue = 0;
  const countStatus = "Positive";
  // controller unit implemented with constants (null controller)
  // the controller has assigned mocked data for testing in browser
  const onIncrementButtonClick = () => {};
  const onDecrementButtonClick = () => {};
  const onResetButtonClick = () => {};
  // user interface unit
  return (
    ...
  );
}
By introducing the gateway unit factory at this stage, you ensure that your application remains decoupled from the specifics of the backend implementation.
Step 4: Connect the Presenter Unit to the Entities Unit
In this step, we connect the presenter unit property by property to the entities unit. The presenter unit is responsible for transforming the entity state into a format suitable for the user interface. This separation ensures that the user interface remains simple and focused only on presentation logic, while the presenter handles any necessary data formatting or status calculation.
For the counter application, the presenter unit derives countValue and countStatus from the count entity state. The status is determined based on whether the count is positive, negative, or zero.
// gateway unit interface (yet empty)
interface CounterGateway {}

// gateway unit factory
const useCounterGateway = (): CounterGateway => {
  return {} as CounterGateway;
};

const INITIAL_COUNT = 0;

function Counter() {
  // entities unit: enterprise business entity (counter)
  // useState is the store utility managing its state
  const [count, setCount] = useState(INITIAL_COUNT);

  // gateway unit
  const gateway = useCounterGateway();

  // presenter unit — derives output data from entity state
  const countValue = count;
  const countStatus =
    count === 0 ? "Zero" : count > 0 ? "Positive" : "Negative";

  // controller unit implemented with constants (null controller)
  // the controller has assigned mocked data for testing in browser
  const onIncrementButtonClick = () => {};
  const onDecrementButtonClick = () => {};
  const onResetButtonClick = () => {};
  // user interface unit
  return (
    ...
  );
}
By connecting the entities unit to the presenter unit, you ensure that any changes to the entity state are immediately reflected in the user interface.
At this stage, the presenter unit is considered closed.
Step 5: Connect the Controller Unit to the Entities Unit and the Gateway Unit
In this step, we connect the controller unit to both the entities unit and the gateway unit by implementing inlined use case interactors. The controller unit handles user interactions, transitions the entity state to new valid states, and communicates with the backend through the gateway. This process also helps to define the CounterGateway interface.
The example below demonstrates how the controller unit performs operations using pessimistic updates:
// gateway unit interface
interface CounterGateway {
  getCount: () => Promise<number>;
  incrementCount: () => Promise<number>;
  decrementCount: () => Promise<number>;
  resetCount: () => Promise<number>;
}

// gateway unit factory
const useCounterGateway = (): CounterGateway => {
  return {} as CounterGateway;
};

const INITIAL_COUNT = 0;

function Counter() {
  // entities unit: enterprise business entity (counter)
  // useState is the store utility managing its state
  const [count, setCount] = useState(INITIAL_COUNT);

  // gateway unit
  const gateway = useCounterGateway();

  // presenter unit — derives output data from entity state
  const countValue = count;
  const countStatus =
    count === 0 ? "Zero" : count > 0 ? "Positive" : "Negative";

  // controller unit — converts user input into use case interactor invocations
  const onIncrementButtonClick = async () => {
    const remoteCount = await gateway.incrementCount();
    setCount(remoteCount); // transitions count to valid state: incremented value
  };
  const onDecrementButtonClick = async () => {
    const remoteCount = await gateway.decrementCount();
    setCount(remoteCount); // transitions count to valid state: decremented value
  };
  const onResetButtonClick = async () => {
    const remoteCount = await gateway.resetCount();
    setCount(remoteCount); // transitions count to valid state: 0
  };
  const onCounterMount = async () => {
    const remoteCount = await gateway.getCount();
    setCount(remoteCount); // transitions count to valid state: initial server value
  };

  // user interface unit lifecycle hook
  useEffect(() => {
    onCounterMount();
  }, []);

  // user interface unit
  return (
    ...
  );
}
At this stage, the controller unit is considered closed.
Step 6: Add the In-Memory Gateway Unit
Until the backend is ready, you can implement an in-memory gateway unit to simulate server-side logic. This allows you to develop and test the application independently of the backend, ensuring the rest of your architecture works as expected.
The in-memory gateway unit implements the CounterGateway interface and manages the counter value in local memory. Each method updates or returns the value as if it were communicating with a real server.
// FILE: types.ts
export interface CounterGateway {
  getCount: () => Promise<number>;
  incrementCount: () => Promise<number>;
  decrementCount: () => Promise<number>;
  resetCount: () => Promise<number>;
}

// FILE: gateways.ts
let count = 5;

// counter gateway unit (in-memory)
export const inMemoryCounterGateway: CounterGateway = {
  getCount: async () => {
    return count;
  },
  incrementCount: async () => {
    count += 1;
    return count;
  },
  decrementCount: async () => {
    count -= 1;
    return count;
  },
  resetCount: async () => {
    count = 0;
    return count;
  },
};

// FILE: hooks.ts
// gateway unit factory
export const useCounterGateway = (): CounterGateway => {
  return inMemoryCounterGateway;
};
Implementing the in-memory gateway unit and updating the useCounterGateway hook did not require any changes to the Counter component. This demonstrates how Clean Architecture allows you to swap gateway implementations without affecting the application core.
At this stage, the in-memory gateway unit is considered closed.
Step 7: Implement the External Resource Unit
Once the backend service is ready, we implement the external resource unit, which represents the counter backend service in our application. The external resource unit encapsulates all HTTP requests related to the service, providing a clear interface for fetching and updating the counter value on the server.
// FILE: api.ts
interface ApiCountDto {
  value: number;
}

// counter external resource unit
export const CounterApi = {
  async getCount(): Promise<ApiCountDto> {
    const response = await fetch("/api/counter");
    if (!response.ok) {
      throw new Error("Failed to fetch count");
    }
    return response.json();
  },
  async incrementCount(): Promise<ApiCountDto> {
    const response = await fetch("/api/counter/increment", { method: "POST" });
    if (!response.ok) {
      throw new Error("Failed to increment count");
    }
    return response.json();
  },
  async decrementCount(): Promise<ApiCountDto> {
    const response = await fetch("/api/counter/decrement", { method: "POST" });
    if (!response.ok) {
      throw new Error("Failed to decrement count");
    }
    return response.json();
  },
  async resetCount(): Promise<ApiCountDto> {
    const response = await fetch("/api/counter/reset", { method: "POST" });
    if (!response.ok) {
      throw new Error("Failed to reset count");
    }
    return response.json();
  },
};
At this stage, the external resource unit is considered closed.
Step 8: Add the Remote Gateway Unit
In this step, we add the remote gateway unit, which acts as an adapter between the application's core logic and the external resource unit. The remote gateway implements the CounterGateway interface and delegates all operations to CounterApi, mapping API responses into the entity values expected by the rest of the application.
The code also shows how the useCounterGateway hook can dynamically select between the in-memory gateway (for development) and the remote gateway (for production).
// FILE: gateways.ts

// counter gateway unit (remote)
export const remoteCounterGateway: CounterGateway = {
  getCount: async () => {
    const response = await CounterApi.getCount();
    return response.value;
  },
  incrementCount: async () => {
    const response = await CounterApi.incrementCount();
    return response.value;
  },
  decrementCount: async () => {
    const response = await CounterApi.decrementCount();
    return response.value;
  },
  resetCount: async () => {
    const response = await CounterApi.resetCount();
    return response.value;
  },
};

// FILE: hooks.ts
// gateway unit factory
export const useCounterGateway = (): CounterGateway => {
  if (import.meta.env.DEV) {
    return inMemoryCounterGateway;
  }
  return remoteCounterGateway;
};
Implementing the remote gateway unit and updating the useCounterGateway hook did not require any changes to the Counter component. This demonstrates how Clean Architecture allows you to swap gateway implementations without affecting the application core.
At this stage, the remote gateway unit is considered closed and the counter app is ready for production.
Conclusion
This workflow shows how Clean Architecture enables you to incrementally build frontend applications or features. It improves code quality, streamlines collaboration, supports parallel work, and simplifies long-term maintenance.

Top comments (0)